Most people who quit calligraphy don’t quit because they lack talent. They quit in week two, after an evening spent copying a beautiful word over and over, getting worse instead of better, and deciding their hands just aren’t made for it.
Their hands were fine. Their order was wrong. Calligraphy is learned the way music is: scales before songs. Strokes before letters, letters before words, and words before anything you’d frame. Follow that order and progress comes steadily; skip it and frustration arrives on schedule.
This is the plan. Eight steps, a tiny kit, and a 15-minute daily routine that takes you from your first wobbly line to writing real words with confidence.
First: what you’re actually learning
Calligraphy is writing letters by a set of rules, with deliberate contrast between thick and thin strokes. It’s different from fancy handwriting, which is fast and even, and from hand lettering, where letters are drawn and redrawn like illustrations. In calligraphy, each stroke is written once, in a fixed order, with pressure doing the work. That’s why it feels slow at first. Slow is correct.
Step 1: Choose your first tool
There are three main paths into calligraphy, and they need different tools:
| Path | Tool | Good for | Learning curve |
|---|---|---|---|
| Brush calligraphy | Brush pen | Modern, bouncy lettering; cards, journals | Gentlest. No ink to dip, nothing to spill |
| Pointed pen | Flexible metal nib, holder and ink | Copperplate, Spencerian, wedding-style scripts | Steeper. The nib snags if you push upward too hard |
| Broad edge | Chisel-tipped nib or marker | Italic, Blackletter, Uncial | Moderate. Thickness comes from pen angle, not pressure |
Our recommendation for most beginners: start with a brush pen. It teaches the core skill of controlling thick and thin with pressure, and you can practice anywhere. Teachers do disagree on size. A small, firm brush pen like the Tombow Fudenosuke is easier to control. Some lettering instructors suggest a larger tip instead, because it makes your strokes and mistakes easier to see. Either is a fine start. Just don’t buy ten pens before you’ve filled ten pages.
Step 2: Gather a tiny kit
- One brush pen (or a pointed pen kit if you’re set on Copperplate).
- Smooth paper. Rough paper frays brush tips and catches pointed nibs. Popular practice choices include marker paper for brush pens, smooth 32 lb laser paper for pointed pens, and Rhodia pads. Avoid glossy or photo paper, which won’t absorb ink.
- Guide sheets with baseline, waist line, ascender and descender lines and slant lines. Our calligraphy alphabet guide includes two free printable practice sheets.
- A pencil for sketching layouts later.
That’s genuinely all you need for the first month.
Step 3: Set up your body before your page
The most common physical mistake is gripping too hard and writing with the fingers. Calligraphy strokes are smoother when they come from the arm. Sit at a desk with your elbow bent at about 90 degrees or more, keep your shoulders loose, and hold the pen lightly, with only the side of your little finger resting on the page. With a brush pen, hold it at roughly 45 degrees to the paper rather than upright. If your hand aches after ten minutes, you’re squeezing.
Step 4: Learn the one rule and the four lines
Every pressure-based style follows the same rule: thin on the way up, thick on the way down. Press as the pen travels down so the tip spreads; ease off as it travels up so it returns to a hairline.
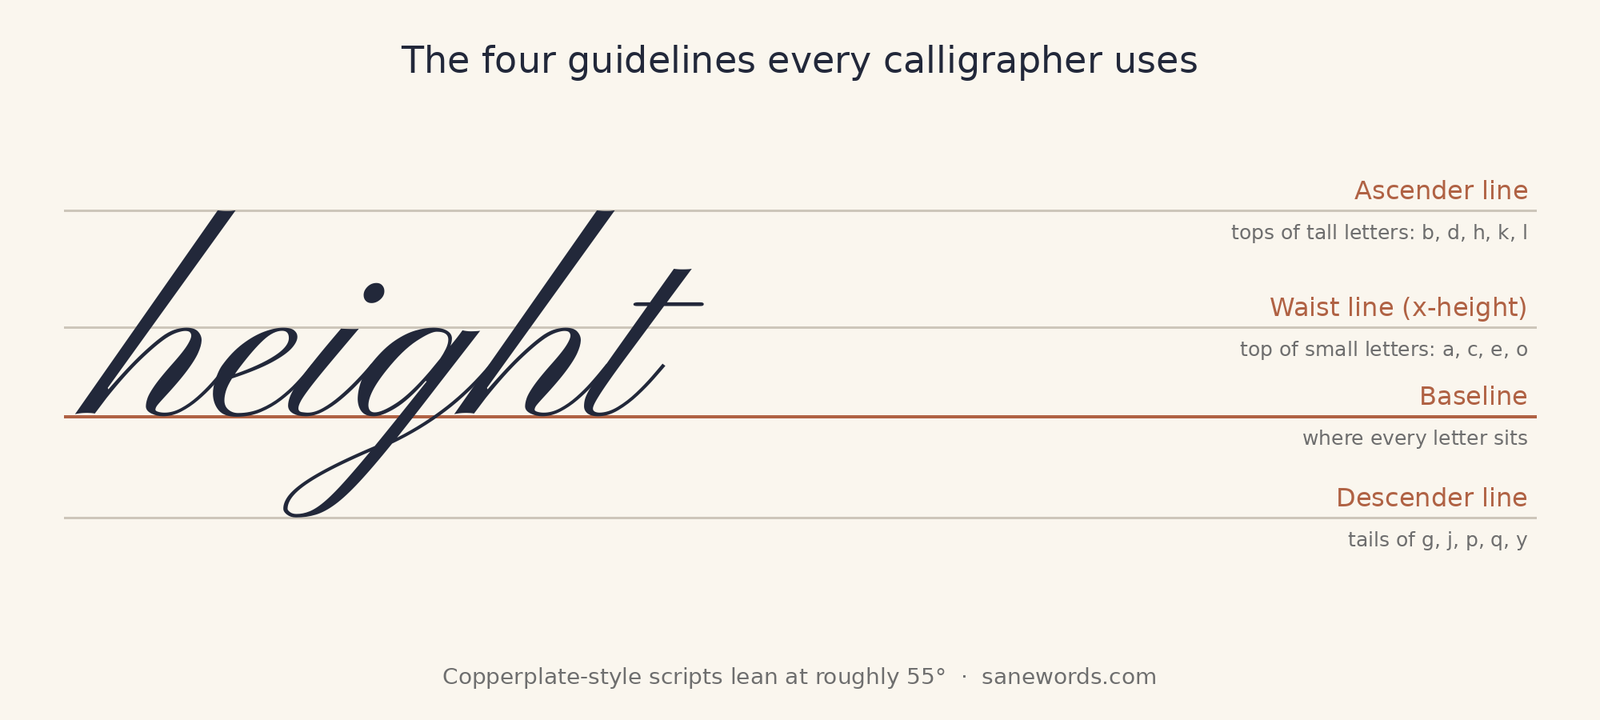
Then there are the guidelines. Letters sit on the baseline, small letters reach the waist line, tall letters reach the ascender line and tails drop to the descender line. Slant lines keep every letter leaning at the same angle. Practicing without guidelines is the single biggest reason beginners’ work looks uneven.
Step 5: Drill the basic strokes (yes, before letters)
Nearly every lowercase letter is built from a handful of shapes: the underturn, overturn, compound curve, oval, reverse oval, ascending loop, descending loop and entrance stroke. Fill rows of each. It feels like busywork. It isn’t. When you later write an “n”, you’ll realize it’s just an overturn and a compound curve you’ve already drawn a hundred times, and it will come out right.
The hardest stroke is the underturn, where heavy pressure has to fade smoothly into a hairline at the bottom of the curve. Expect it to look clumsy for a while. Everyone’s does.
Step 6: Learn letters in families, not a to z
Practicing the alphabet in order means jumping between unrelated shapes. Group letters by the strokes they share instead: i, u, t and w; then n, m, v and x; then the oval letters a, c, d, e, g, o and q; then the tall loops b, h, k and l; and finally the tails. Before each letter, look at a good exemplar and think about its shape and proportions, rather than copying your own previous attempt. Our A–Z calligraphy alphabet lays out every letter for reference.
Step 7: Graduate to words and spacing
Single letters can be lovely and still look wrong together. Once a family feels comfortable, write words built only from those letters, such as “mini”, “union” or “cocoa”. Watch the gaps between letters: uneven spacing is far more noticeable than a slightly imperfect letter. Keep every letter readable, too. A flourish that turns an n into an h isn’t style; it’s a typo.
Step 8: Practice little and often
Calligraphy is muscle memory, and muscle memory is built by repetition spread over time. A few focused minutes a day beat one long weekend session. Here’s a 15-minute routine you can repeat daily:
| Minutes | What to do |
|---|---|
| 0–3 | Warm up: rows of thick downstrokes and thin upstrokes. |
| 3–7 | Drill one basic stroke, slowly, on guide sheets. |
| 7–12 | Practice one letter family, tracing first, then freehand. |
| 12–15 | Write three words using only letters you’ve practiced. |
Leave your pen and sheets out on the table. If practice takes no setup, you’ll actually do it.
When you’re ready for a pointed pen
A pointed nib spreads its two tines under pressure to make thick strokes and springs back for hairlines. It’s the tool behind Copperplate and Spencerian. Three things help when you make the switch:
- Start with a firm nib. The Nikko G is widely recommended for beginners because it’s forgiving yet still gives good line variation.
- Consider an oblique holder if you’re right-handed and learning Copperplate or Spencerian. It angles the nib to match the steep slant of those scripts. A straight holder works well for many other styles.
- Choose a smooth-flowing ink. Overly thick ink clogs the nib.
Expect the nib to catch on upstrokes at first. Lighter pressure on the way up fixes it, and that’s exactly the skill your brush pen practice has already built.
Six mistakes that slow beginners down
- Treating it like fancy handwriting. It’s a discipline with rules. Respect them and you’ll improve faster.
- Practicing a to z in order. Learn letters in stroke families instead.
- Ignoring spacing. Practice whole words early, not just isolated letters.
- Copying yourself. Look at a good model before every letter, not at your last attempt.
- Gripping hard and writing with the fingers. Relax, and let the arm move.
- Sacrificing legibility for flair. Keep letters readable first; style comes later.
Frequently asked questions
Can I teach myself calligraphy?
Yes. Many calligraphers are largely self-taught using guide sheets, exemplars and online tutorials. The key is following a structured order: strokes, then letters, then words.
How long does it take to learn calligraphy?
It varies widely. With short daily practice, most beginners see clear improvement within a few weeks, and confident, consistent letters take months. Regular practice matters far more than total hours.
What is the best pen to learn calligraphy?
A brush pen is the easiest start for most people. A small, firm one like the Tombow Fudenosuke gives good control. For traditional pointed-pen scripts, a Nikko G nib in a holder is a common first choice.
Can I learn calligraphy with a regular pen?
You can practice letter shapes with any pen using faux calligraphy, adding thickness to downstrokes by hand. It’s a great way to learn where the weight goes before buying special tools.
Is calligraphy hard to learn?
It’s slow rather than hard. The movements are simple, but they need repetition until your hand does them without thinking. Patience is the real skill.
Your first session, tonight
Print a guide sheet. Sit with your elbow on the desk and the pen held lightly. Fill one row with downstrokes, pressing gently on the way down, and one row with upstrokes, barely touching the paper. That’s it. You’ve started learning calligraphy the right way, which is more than most people who give up can say.
Explore more in our Calligraphy & Hand Lettering guides, and find brush pens and more in the best pens for journaling.
Sources
Pointed-nib, Nikko G, holder and ink advice comes from Scribblers. Practice paper guidance draws on Loveleigh Loops. Brush pen technique and the small-versus-large tip debate draw on Lettering Daily. Common mistakes and posture advice draw on Studio Chavelli, and the basic strokes on Loveleigh Loops’ guide to the eight basic strokes.

Leave a Reply